Saturday 24 August 2013

Best high end and drugstore foundation! | a-reill

Posted by Unknown at 05:58 0 comments
Hey everybody!
 
Sorry I haven't really posted for a few days. Rather than the lack of posts being down to busy-ness, it  was actually down to I didn't know what to write about.. But, I finally came to the conclusion that I was going to discuss my favourite high end and low end foundation! For high end I've picked out the Yves Saint Laurent Le Teint Touche Éclat, and for drugstore I've chosen Bourjous' Healthy Mix serum.


Bourjous: Shade 51 - light vanilla/vanille clair
YSL: Shade BR20
Both foundations contain 30ml of product, which is pretty much the universal amount for a foundation.
They both also contain a pump, pictured here.
 
 
Swatches
(Left YSL, Right Bourjous - both in natural daylight)
 
 
Reviews-YSL
This foundation is an illuminating foundation, and therefore has a dewy finish. This is one thing I'm not too keen on. Once mattified with powder, it's a lot more manageable for my oily skin. Having oily skin, I personally think that dewy or radiance foundations don't do much for me, specifically my nose - which is ridiculously shiny. The shade of this foundation is ok.. I was matched for it and given a 7 day sample, and this is the shade I was given, and I then purchased for my Mum's wedding.. and I do feel it is a little bit too pink for me. I have yellow/olive undertones but I am still pale, which is weird because most pale people have pinker undertones. The consistency is nice and smooth, and it does apply well. Once on I do find it creases in my forehead lines and under my eyes when it's settled after about 5 minutes, but this isn't too much of an issue, as all I have to do is blend the lines in with my fingers. It does last all of a school day on me - which is about 12 hours (when I finally take it off) which in all fairness is good, even if I do have to touch it up with powder throughout the day, but this is more my personal preference. I do really love this foundation. I find my skin looks healthier and more radiant when applied. The coverage I would say is light to medium buildable, but I'm not really an expert! I have tried other high end foundations, such as ones from Esteé Lauder and Lancôme, and I do prefer this one, I just wish the shade was more yellowy! I use this as my going out/special occasions foundation, as it is really expensive (to me), as it's £29 from Boots! It's a very natural looking foundation, and it is described as "liquid skin in a bottle" (as by the women at the YSL desk I visited), and I definitely would say it is! Overall a lovely, natural, foundation. I would recommend it more towards drier skin types, but I make it work, and I'm glad I can because it is an amazing product!
 
Review-Bourjous
This foundation is supposedly a "semi-matte" finish, which I suppose is dewy. As with the YSL one, I make it work, even though it probably is supposed to lean towards drier skin types. It's a gel based foundation, which is supposed to help with blendability, as the bottle claims it's an "instant blending gel, flawless complexion, undetectable coverage". I would say its a light to medium buildable coverage. I have more to say about this foundation, as it is my everyday choice and it's my 3rd bottle of the stuff - so here we go. I LOVE THIS FOUNDATION. Ok so it's probably not supposed to work for me very well, but it does, and I love what it does to my complexion and my skin. First off- it smells INCREDIBLE, like lychee, goji berries and pomegranate. The coverage is light to medium buildable, but it doesn't cake. It can look greasy if too much is applied though. The colour is PERFECT for me. Bourjous being absolute babes, have made their foundations yellow toned. YES YES YES. WIN. So no matter what coverage or finish I'm looking for, I will always be able to choose exactly the right shade from Bourjous, even with a tan! That immediately gives the foundation a heads up from me, as getting the right shade can totally change your opinion on a product! I love the formula. It applies seamlessly into my skin with my fingers, as well as my Real Techniques expert face brush, and leaves me looking flawless, and not overly dewy. I do powder my face, especially my t-zone, but some of the glow still does show through which is good, as I'm not too much of an expert at highlighting.. I always seem to put it slightly in the wrong place and then it just looks awful! The packaging.. isn't the best aspect of the product, it does look a little cheap, but the plastic bottle is quite sturdy, I nearly mistook it for glass when I first purchased it! Its £10.99 a bottle, which is pretty much a THIRD of the price of the YSL one, and I would kind of say it's almost a dupe, which could explain why I like them both so much! It has been compared to one of the Chanel foundations (Vitalumiére aqua maybe?) as been almost identical, which does make sense as Chanel owns Bourjous (Fact of the day for you!). Anyway back on track Abby.. It lasts a full day on me, again with touch ups of powder, and to be honest it is my holy grail foundation. I recommend this to everyone! Perhaps not older ladies though, as it might settle into fine lines, I'm not entirely sure though, so anyway, go and BUY IT!!
 
Face Swatches (Sorry I look so miserable!)


Left YSL, Right Bourjous
Excuse the fact I have no other makeup on and my brown "division line" makes my nose look the size of Jupiter :(
 
Thank you for taking the time to read this as it was a very lengthy post and I apologise for that!
Will you be going out to buy either of these foundations? I would if I was you!!xx
 
Bourjous Healthy Mix serum - £10.99 from drugstores eg. Boots and Superdrug
YSL Le Teint Touche Éclat - £29 (may vary slightly) from most good retailers eg. Boots, Debenhams and House of Frazer.


Wednesday 21 August 2013

FOTD: Bronzed goddess | a-reill

Posted by Unknown at 04:30 0 comments
Hello all!
So I thought I'd show you what look I created on my facial canvas today! (sounds better than just "face" loll..)
*I am by no means a makeup artist and I don't claim to be, I'm just a girl who loves makeup and sharing her ideas, so don't get the wrong end of the stick please!*
 

I used a lot of contour powder, and I put bronzer directly on my cheekbone, to create a very sculpted look. I have also used highlighter to emphasize my cheekbones but you can't see it in this photo, boo.

 
A close up of my eye, for some reason I love this picture haha! I applied Lancôme hypnose mascara to give a really spidery effect to my eyelashes, as that's a look that I just adore! I also ran a dark brown shadow on the outer corner of my lashline to open my eye more. I wet some white and cream eyeshadow and placed a harsh line in my inner corner to open my eye out further. Also a classic cat eye always helps!
 

Sorry for the hair in my eye ah! But this is a photo with my eye closed. I used my finger to apply my Maybelline colour tattoo in On and On bronze all over my lid. I thought this would act as a shimmer base, to help my shadow stay put longer, as I don't yet own an eye primer. You can see the cat eye here, its not to thin but also not too thick, personally I think it is the perfect width for my eye shape. I used a gold shadow on the centre of my eyelid and blended that out, putting a coppery-bronze on my outer corner and blending that slightly into my crease. I then used a dark shimmery brown, blended on the outer edge to add a bit more drama to the look.


Heres the completed look!
 
I hope you enjoyed reading the blog post, and perhaps you could take a few tips from it, who knows? Sorry for the mirror selfie, but I looked awful in all the other photos I took haha!
Will you be replicating this look?xx

Tuesday 20 August 2013

What's in my makeup bag and how much is my face worth? | a-reill

Posted by Unknown at 06:55 0 comments
Hello lovelies!
 
So today I thought I'd do a post showing you what I keep in my makeup bag, I wont go into too much detail about what I think of each product as I will probably do a review of some of them at some point. If you do want me to go into more detail about each thing, just comment asking me and I will be more than happy to :)
So lets get started!
 
The bag
 

I keep my everyday products in this basic navy and cream floral quilted cosmetics bag. I love the pattern, and its the perfect size to house a face-worth of makeup products. It was only £3 from my local Primark, which I thought was impressive, since it looks like it costs more than that amount.

The products
 
 
Some people would say I wear a lot of makeup products, but I don't particularly wear copious amounts of each one? So personally I don't see what the problem is with it. At least I apply my makeup correctly unlike many girls my age! I made the next photograph larger as so you can see the names of the products better.


(Left to right by row - FCUK colour her eyes and lips palette, Sleek contour kit in light, Bourjous little round pot blusher in 41 Healthy Mix, Maybelline Color Tattoo 24HR in on and on bronze, Rimmel Stay Matte powder in 001 Translucent, Maybelline Dream Matte powder in 01 Rose Nude, Elf brightening eye colour quad in Brownstone, Maybelline Eyestudio Mono 750 in Chocolate Chic, Jemma Kidd Instant Lift Skin Perfecting Primer (sample size), Bourjous Healthy Mix Serum foundation in 51 Light vanilla, Maybelline The Eraser Eye concealer in light, Collection Lasting Perfection ultimate wear concealer in 1 Fair, Maybelline Baby Lips in Cherry me, (Top to bottom) Rimmel Scandal Eyes Thick and Thin eyeliner in black, L'Oreal Super Liner Black Lacquer in black vinyl, Eyeko skinny eyeliner in black, Maybelline The Mega Plush Volum' Express in black)
 
Well, that was a lot to type out!
 
Face/Complexion
 
I love the effect these products give my face when I use them all together. I firstly apply the primer if I feel I need my makeup to stay on longer that day, i.e if I'm going shopping all day. I apply the Collection concealer on all my redness, blemishes, spots, and I also put a little on my dark circles. I blend all this in with the Real Techniques expert face brush. I then take the Maybelline concealer and apply this under my eyes, to brighten up the area without a heavy coverage. I use one pump of the Bourjous serum, and dot it on my face. I again, take the real techniques brush and use a stippling motion to spread it across my face, and I then use circular movements to blend it in seamlessly. I then take a large kabuki, and use either of the 2 powders, depending on the type of coverage I'm looking for. The Rimmel one can look cakey when too much is applied, but works better to control my oil, yet the Maybelline one offers a lighter coverage, but looks better on the skin. I've recently been combining the two together. I apply them with a large kabuki brush. I then use an angled contour brush from the Fearne Cotton brush set I received as a gift, and I take the darker of the two colours and contour the hollows of my cheeks, as well as my jawline and temples, not too heavily though. The highlighter I just use my finger then blend it out with my kabuki. I place this along the top of my cheekbones, the tip of my nose, and my cupid's bow, as well as some on my forehead and chin, to accentuate those areas. I feel like this gives me some manageable dewy-ness, as I have oily/combination skin and anything too much just makes me look like a giant grease-ball.. not so good. I then just take a Lancôme small powder brush and apply the blusher to the apples of my cheeks, you can locate those by smiling. AND VOILA! Flawless canvas.
 
Eyes and Brows


Okay, so I know you're probably wondering why I have 3 liquid eyeliners. I used the Eyeko one for a rough line from my outer corner upwards to make sure they're both equal, as it is the easiest to remove. I then complete my cat eye and fill it in with the Rimmel one, and then if I want it glossy, I go ahead and apply the L'Oreal one on top after I've completed my eye shadow. Sounds like a lot, but it looks okay haha! I take the Maybelline colour tattoo and apply it all over my lid, blending it so it looks more natural. I then use a light cream matte shade from the FCUK palette and apply it along my brow bone and slightly in my inner corner blending it out so it graduates. I then take either the dark grey from the ELF quad or a darker brown from my palette and apply that on my outer corner, in a straight line up from my cat eye, then curving it downwards towards my inner corner, so it has a defined shape to it. I blend it inwards so it looks sharper on the outer corner. I then apply 2-3 coats of mascara, making my bottom ones long and spider-like. I then take whatever remains of the dark colour on my brush and run that along my lower lash line so that it makes my eyes look more smoky and also more open. That sounds very complicated, I'm not all that good at describing things in text! For my brows I fill them in with a No7 gel liner brush (like the one you get with the Maybelline gel liner) and make them a square shape at the front and very angled. Just think scouse-brow! I haven't included a separate section for lips, as all I do is apply my Maybelline baby lips, which isn't exactly difficult or descriptive.
 
So I hope you enjoyed this post! I might do this routine in pictures at some point so you can see the completed look. Sorry it sounded so repetitive but I didn't really know how else to word it..
 
I've also added up all the costs of the products I used, and it came to..
 
£113.78!!!


That wasn't even including tools, crazy that I use that much worth of stuff on my face every single day!
 
How much is your face worth?xx

Monday 19 August 2013

Aussie colour mate shampoo & 3 minute miracle first impressions! | a-reill

Posted by Unknown at 08:46 0 comments
Hello again!
 
I know you may be thinking I'm posting a lot, but I like doing it, so who's to judge me eh? So the other day I happened to be in Superdrug, and I noticed Aussie had special offers on. I've always wanted to try the brand, but it's just so expensive, and still only being in my early teens, I can't really justify buying it. However, the large bottles are 2 for £9, and the smaller one 2 for £6, so I picked up the small ones, and to be honest, I think I'm going to return to purchase the larger ones!
 
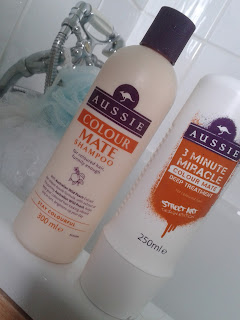
(Aussie Colour Mate shampoo, and 3 Minute Miracle Colour Mate deep treatment)
 
I firstly applied quite a decent amount of the shampoo, and lathered it into my hair, starting from the front section where my fringe is, then putting it at the nape of my neck, and working my way towards the middle as I always do. The first thing I noticed about this shampoo is that it smells like peaches, win! I love the scent of peaches, I literally sit and sniff my Maybelline Baby Lips in Peach kiss all day.. is that weird? Anyway, the shampoo lathers really quickly, and I normally read the back of the bottle, as I like to let the shampoo sit for about a minute just to make sure my hair will be thoroughly cleansed..
 
(Back of Aussie shampoo and deep treatment)
 
 
I know you most probably cannot read what is written on the back of the bottles, but I thought I would photograph them anyway. Also I can't actually type out what they claim to do or whatever, because my mum is currently in the shower.. and using them, but they claim to do lots of marvellous stuff to your hair!
 
After rinsing out the shampoo, my hair really did feel cleansed, and in need of something to soften it up a bit, so I squeezed out some of the treatment, and loaded it onto the ends of my hair. I have bleached the ends of my hair quite a bit recently (after a mishap that caused me to have blue ombre.. not good), so I was intrigued to see how the so called "miracle" would perform. Fair show I say! My hair feels as soft as silk, and I honestly think it has improved the condition of my hair after just one use, and I only left the deep treatment on for half the time it suggested! I FREAKING LOVE THIS STUFF. I am going to try to convince my mum to keep buying it, because I use heat on my hair every day, and this stuff will help to improve the condition of it tremendously. I see it being worth the price tag, don't you? I also love the packaging, its a bit of a gimmick but just look:
 
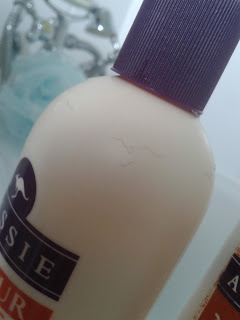
(Top of the shampoo bottle)
 
Can you see the tiny kangaroo detailing? I just thing they're so fricking adorable :) - can you tell I'm one for packaging? Anyway I highly recommend this, if, like me, you have damaged hair. They also do it in many different varieties, not just coloured hair, so don't worry if you have natural hair!
 
Shampoo £4.49 and Deep treatment £4.99, available from Boots and Superdrug (UK). Currently on offer; 2 for £6 from Superdrug, or 3 for £10 from Boots, grab them cheap while you can! xx


Sunday 18 August 2013

NOTD: Perfect Paisley.. or not? | a-reill

Posted by Unknown at 08:36 0 comments
Hello again:-)..

Just a quick NOTD post for you all.. I went out for a family meal today, so I thought it was appropriate to try out some nail art with my new Barry M nail art pen, and needless to say it didn't go the best.. I'm used to using the Models Own nail art pen, or dotting tools with polish, so perhaps trying out an intricate design with a new tool wasn't the best idea I ever had.. but oh well, I tried!
 
The photo below shows you the products I used:

(Products left to right - Sally Hansen nailgrowth miracle, Miss Sporty clubbing colours nail varnish in 320/Pop Fiction, Nail art pen by Barry M in white, Cutex nourishing nail varnish remover)
 
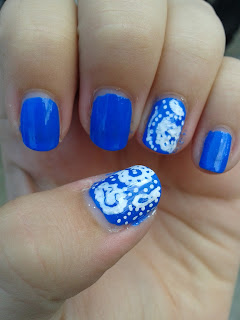
I firstly applied the Sally Hansen polish as a base-coat, and I would highly recommend it! I bit my nails to shreds for years, and only this year have a grown them, purely for the willpower to have nice nails for my Mum's wedding (which I did)! This helped tremendously, and I really do think it helps your nails strengthen and grow, however it does work best solo, rather than a basecoat, but anyway its still good, yet pricey for £10. The Miss Sporty polish was then applied in 2 coats. I felt the fan shaped brush helped on my wider nails, but having narrow pinkies, I felt that I had to use the brush sideways to make sure I didn't overspill it onto the surrounding skin. Its quite opaque for only £1.99, but I'm not sure how well it will do on the longevity side of things.. but its still a gorgeous, deep, cornflower blue colour - sort of a darker Essie Bikini So Teeny, but no shimmer. Now the nail art pen.. I adore the formula of this, it would be perfect for French manicure tips, and on the nail art aspect it is a really good concept and design. For £5 a tube, I don't feel it is too expensive, but I'm not sure how long a 'tube' (if you like) will last. You do however, need to make sure your nail polish is completely dry underneath, or it doesn't really apply properly and smoothly. So here's the design I tried to create.. note the word TRIED.
 
 
PAISLEY! 
 
 
I do think it looks rather cute.. perhaps more-so if it was applied a bit better. I sealed in the design with some more of the Sally Hansen clear polish, as I am yet to find a decent topcoat. I was thinking perhaps buying a miniature bottle of Seche Vite? Not sure if it's worth the hype, as I've heard some mixed reviews on it. Anyway that's all for this post? Will you be trying to replicate this design? If you do, I hope it turns out better than mine did!!! xx


Saturday 17 August 2013

Maybelline Baby Lips: Review, hand, and lip swatches! | a-reill

Posted by Unknown at 12:07 0 comments
Hello girlies!

I have a review today, of the every so infamous Maybelline Baby Lips!
Now, I wanted these badboys for absolutely FOREVER, but couldn't justify spending £7 or more on amazon.co.uk just to get them shipped over from America - and that was just for one tube of the stuff, redi-cu-lous prices! So, when I heard via the blogger-bird that these were released in the UK, I went on the prowl immediately to find them. After searching both my local boots and superdrug with no luck, it just so happened as I was in a neighbouring town, that they were stocked in there! But, they were by the till, so I wouldn't of known if it wasn't for the fact I was buying some more eyeliner, how sly of them! They were on 3 for 2, so of course, I snapped up 3 as quick as possible!


The shades left to right, are Cherry me, Pink punch, and Peach kiss. (Swatches on my hand and lips will be included at the end of this post.) These were sure worth waiting for!! The formula of these is so smooth and just glides on with ease, coating the lips in a non sticky balm, with quite good pigmentation - considering these are only a lip balm! My lips feel soft and supple after and when I have used these, and I have noticed a difference in them - these lip balms aren't any wonder workers like Carmex, but they do help keep my lips in good condition. If you're looking for a quick-fix to help salvage cracked lips, I would opt for something more intensive and perhaps medicated (like Carmex), but for everyday wear and maintenance these are perfect! They smell amazing too! Cherry me and Peach kiss smell like their name-fruit, but I'm not sure what Pink punch is supposed to smell like - to me it just smells like a sweet lovely smell! At £2.99 a pop, these are essential and I feel like everyone should own one - even guys!!! (Perhaps one of the 3 clear shades instead though..) The packaging is also very cute, these things are just full of plus's. My nan borrowed Cherry me, and liked it so much she asked me to go out and purchase one for her.. score! However, for night time wear I think it would be wise to buy a clear one, as I wore Peach kiss to bed, thinking it wouldn't be an issue as it was the palest one of the bunch. W R O N G. I woke up to find my lovely white pillow with a few peach-coloured smudges on it.. not too good. Next I will purchase Hydrate, to see if that offers anything as spectacularly good as the 3 tinted shades, anyway, BIG THUMBS UP MAYBELLINE!!

(Shades clockwise - Peach kiss, Cherry me, Pink punch)
Taken in direct sunlight, no flash


(Lip swatches [Shades clockwise - Pink punch, Cherry me, Peach kiss])
 
 
Overall star rating: 5/5
I am really impressed with these nifty little things, will you be going out to purchase any? xx


Obvious questions answered! | a-reill

Posted by Unknown at 09:23 0 comments
Hello lovelies, so as I am already guessing  (accurately) you must be reading this post.. correct?

A few questions that I am sure will be lurking in your minds are going to be answered here, just to clear up some details..

1) Why is your header out of line?
Well, because I used a blog template, I had certain difficulties with the header actually fitting correctly after I edited it to say what I wanted it to.. so apologies for that, but its not that much of a problem? It just looks somewhat.. annoying.


2) What is this blog going to be about?
Basically, this blog is going to consist of reviews, hauls, FOTD/OOTD's, weekly want's and that sort of thing. Just a typical fashion and beauty blog. Oh the joys.


3) A bit of info about you?
My name is Abby, I was born on the 18th October 1998, and I'm from the glorious(ish) country of England.. anything else don't hesitate to ask! on my social networks..
Twitter: @a_reill  - blog related (will be up and running soon, not as of yet though)

Ask.fm: /abbyreilly
Facebook: /w0tyoulookingat

4) Why "'a-reill'.blogspot.co.uk"?
First initial of my name: A
First 4 letters of my last name: Reill
And I also thought it also kind of looking like the name Ariel, and mermaids are mint! I would of had it with no "-" but some indian guy already took that name.. damn.


5) How often will you post?
I am currently in the summer holidays for the next 2 weeks, so I will post practically everyday up until the 4th September, when I'm not sure when I will have time as I will be back in full time education. I will be in year 10 which means I am properly starting my GCSE/BTEC curriculum, so lots of homework and exam prep will be upon me! I've also started doing 5 mile walks on Wednesdays, Fridays, and Sundays, so when I am back at school I will probably post on Tuesdays and Saturdays, or whenever I have something new to show/talk about!


So that's pretty much it for this post, hopefully I shall gain at least a few follower of my blog but who knows - I might just end up talking to myself all the time!

I will also probably change my blog layout/theme in the near future, either that or work out a way to sort out that poxy header!!


Anyway that's all for now, speak soon :) xx
 

a-reill.blogspot.com Copyright © 2012 Design by Antonia Sundrani Vinte e poucos